This blog contains experience gained over the years of implementing (and de-implementing) large scale IT applications/software.

HowTo: Install SAP HANA 2.0 in a VM in less than 30minutes – Part #3

This is the third part of my (quite large) post on how to install an SAP HANA 2.0 database into a SUSE Linux for SAP 12 SP3 virtual machine.

See Part #1 of the post here.
See Part #2 of the post here.

We continue from where we left off in part 2, just after we created a new 50GB disk volume for our new HANA install.
Check the new partition:

# df -h /hana
Filesystem                   Size  Used Avail Use% Mounted on
/dev/mapper/volHANA-lvHANA1   50G  33M   50G   1% /hana

Unmount the CDROM and install VMWare tools (I need it for access to my VMWare shared folder):

# umount /mnt/dvd

Select the option to re-install VMWare tools:


Mount the CD and extract the TAR file:

# mount /dev/sr0 -t iso9660 /mnt/dvd
# cd /tmp
# tar -xvf /mnt/dvd/VMwareTools-10.1.15-6627299.tar.gz
# cd vmware-tools-distrib
# ./vmware-install.pl

Choose YES to ALL prompts (especially to the ones to replace existing files).
Disable some SUSE Linux services that are more than likely not needed (in this specific case) and just consume precious memory:
Disable VMware thin printing:

# chkconfig vmware-tools-thinprint off

Disable Linux printing:

# chkconfig cups off

Disable Linux auditing:

# chkconfig auditd off

Disable Linux eMail SMTP daemon:

# chkconfig postfix off

Disable sound:

# chkconfig alsasound off

Disable NFS ( you might need it…):

# chkconfig nfs off

Disable the Machine Check Events Logging capture:

# chkconfig mcelog off

Double check the IP address of your VM:

# ifconfig | grep inet


Your IP address should be listed (you can see mine is 192.168.174.129).
If you don’t have one, then your VM is not quite setup correctly in the VMWare properties or your networking configuration is not correct, or you don’t have a DHCP server on your local network, or your network security is preventing your VM from registering it’s MAC address.  It’s complex.
Assuming that you have an IP address, check that you can connect to the SSH server in your VM using PUTTY :

Enter the IP address of your VM server:

Log into the server as root:

Now we’ve got access to the VM and disk space to create our HANA database and put the software.
To perform the HANA install, I’ve extracted my HANA patch/install media into a VMWare Shared Folders folder and simply extract the SAR file to my PC using SAPCAR.exe, sharing the directory location through VMware to the guest O/S.
Since I’ve used VMWare shared folders, I need to mount my folder (it’s shared via the VMWare Tools(:

# cd /mnt/hgfs/Downloads      [my VMware share name is “Downloads”]
# cd SAP_HANA_DATABASE      [this is my extracted SAR file]
# ./hdbinst –ignore=check_diskspace,check_min_mem

You will be prompted for certain pieces of information.  Below is what was entered:
Local Host Name: hana01
Installation Path:   /hana/shared
System ID:             H10
Instance Number: 10
Worker Group: default
System Usage: 3 – development
System Administrator Password:  hanahana
System Administrator Home Dir:  /usr/sap/H10/home
System Administrator User ID:  10001
System Administrator Login Shell:  /bin/sh
ID of User Group (sapsys): [I selected any]
Location of Data Volumes:  /hana/shared/H10/global/hdb/data
Location of Log Volumes:   /hana/shared/H10/global/hdb/log
Restrict maximum memory allocation? N
Database SYSTEM user password:   Hanahana1
Restart instance after reboot:  N

Summary before execution:
   Installation Path: /hana/shared
   SAP HANA System ID: H10
   Instance Number: 10
   Database Isolation: low
   System Usage: development
   System Administrator Home Directory: /usr/sap/H10/home
   System Administrator Login Shell: /bin/sh
   System Administrator User ID: 1001
   ID of User Group (sapsys): 79
   Location of Data Volumes: /hana/shared/H10/global/hdb/data
   Location of Log Volumes: /hana/shared/H10/global/hdb/log
   Local Host Name: hana01
   Worker Group: default

Installation will begin:


Installation & instance startup time was around 45 minutes due to the memory swapping.

That’s it for now.
We have a basic SYSTEM database (SYSTEMDB).

Some things to note at this point:
– SYSTEM database data and log files reside in /usr/sap/H10/SYS/global/data and /usr/sap/H10/SYS/global/log directories (linked to /hana/shared/H10/global).
– Initial usage of disk is around 4GB for data and 1 GB for logs.
– Used memory is around 6GB.
– The HANA Cockpit URL would be (if it was installed) https://192.168.80.2:4310/sap/hana/admin/cockpit   or port 8010 for non SSL.
– The above two URLs are served from the xsengine via the webdispatcher.
– You cannot permanently stop the webdispatcher or xsengine (but I can…).
– SAP note 2517761 tells you how to connect via HANA Studio to the system DB.
– You will need to add the h10adm username and password into HANA Studio to allow you to stop/start the system.
– You may need to add the hana01 and it’s FQDN to your PC’s hosts file to be able to successfully stop/start the system from HANA Studio.
******  OPTIONAL ********

We can slightly reduce the memory requirements of the statisticsserver (now embedded into the indexserver process) by following SAP note 2147247 to disable the inifile_checker service in the global.ini:
Switch to h10adm Linux user:

# su – h10adm
> hdbsql -i 10 -u SYSTEM -p Hanahana1 -d SYSTEMDB
hdbsql SYSTEMDB=> ALTER SYSTEM ALTER CONFIGURATION (‘global.ini’, ‘system’) SET (‘inifile_checker’, ‘enable’)=’false’  WITH RECONFIGURE;
hdbsql SYSTEMDB=> quit

******  OPTIONAL ********
We also reduce slightly the system global allocation limit to 12GB, so that we can consequently reduce the VM memory from 24Gb to 18GB:
NOTE: When you do this, you will not be able to run a Tenant Database because the Tenant DB indexserver process will need at least 8GB of memory to start.

> hdbsql -i 10 -u SYSTEM -p Hanahana1 -d SYSTEMDB
hdbsql SYSTEMDB=> ALTER SYSTEM ALTER CONFIGURATION (‘global.ini’, ‘system’) SET (‘memorymanager’, ‘global_allocationlimit’) = ‘12288’ WITH RECONFIGURE;
hdbsql SYSTEMDB=> quit

Restart the HANA system:

> sapcontrol -nr 10 -function Stop

Wait for it to be stopped:

> watch sapcontrol -nr 10 -function GetProcessList

Press CTRL+C once everything is shutdown (apart from the HDB Daemon).
Exit back to root:

> exit

Shutdown the server:

# shutdown -h now

Adjust the VM memory to be 18GB:

Power on the VM:

Log in as h10adm and start the HANA system:

> sapcontrol -nr 10 -function Start

******  OPTIONAL ********
We can create a new tenant database as follows (we would need at least 24GB of memory for SUSE in order to create and run the SYSTEM DB and the Tenant DB):

# su – h10adm
> hdbsql -i 10 -u SYSTEM -p Hanahana1 -d SYSTEMDB
hdbsql SYSTEMDB=> CREATE DATABASE HT1 SYSTEM USER PASSWORD Hanahana1;
hdbsql SYSTEMDB=> quit

If you wish to stop the Tenant database from starting, you can use SQL as per the help.sap.com, or if your SYSTEM DB will not start also, then you can use the temporary method (probably not recommended by SAP) of exporting the topology using hdbnsutil, adjusting the export file to set the Tenant DB “status” to “no” and then re-import the file using hdbnsutil.
Should you need to quickly (and nastily) kill off the SYSTEM DB and Tenant DB processes, you can use the hdbdaemon command: “hdbdaemon -quit”.

HowTo: Install SAP HANA 2.0 in a VM in less than 30minutes – Part #2

This is the second part of a three part post on how to install an SAP HANA 2.0 database into a SUSE Linux for SAP 12 SP3 virtual machine.
See Part #1 here.

During the VM start-up you may be prompted by VMWare to download the VMWare Tools, you should do this (it’s about 1 minute):

The SUSE installation can be started:

Customise the locale settings and accept the terms:

We skipped registration (we don’t need to update SUSE):

Select “SUSE Linux Enterprise Server for SAP Applications” and since we will use SSH, de-select “Enable RDP”:

Click “Network Configuration” in the top right hand corner:

I adjusted my install to use a static IP address, I also setup the hostname and fully qualified domain name at this point (you can change this later using “yast lan” if you want):
IP: 192.168.80.2  (relevant to my VMWare host-only setup)
Subnet: 255.255.255.0
Hostname: hana01.fqdn.corp

On the next page I added the same hostname and FQDN, then set the DNS resolver policy to “Only Manually” which will allow me to not use DNS at all:

We don’t need any addons:

Check the root partition size on /dev/sda1 and click “Edit Proposal Settings”:

We need to adjust the root partition format to be XFS:
NOTE: XFS is the only supported filesystem for the HANA data and log areas, so why not use it for everything.


Set the timezone:

Set the root password:

On the summary screen disable the firewall and ensure that SSH is enabled:

To minimise memory usage, we set the default start-up mode to “Text Mode” (to change click “Default systemd target”):

After all the screen prompts were answered the install time was approx 10 minutes (at least 1 coffee).
NOTE: There were a couple of instances where a package failed to install.  Clicking “Retry” completed the package installation.
We now need to apply the required O/S changes as per SAP note 2205917.  We can use the saptune command to do this:

# saptune solution apply HANA

Enable SAPTUNE to auto-start:

# saptune daemon start

Shutdown the server.

# shutdown –h now

Edit the VM to add a second hard disk for the HANA database:


We assign 50GB in one single file:


Power on the VM.
Log back in as root once it has rebooted.
Check that you can resolve the hostname:

# hostname
hana01
# hostname -f
hana01.fqdn.corp

15 MINUTES HAVE NOW ELAPSED!
Let’s mount the SUSE ISO on the server:

# mkdir /mnt/dvd
# mount /dev/sr0 -t iso9660 /mnt/dvd

Now install the Java runtime:

# cd /mnt/dvd/suse/x86_64
# rpm -i –nodeps java-1_8_0-ibm-*

Check the version is 1.8.0:

# java -version

Now we need to create our HANA database disk partitions.
First check which disk you’re using for the O/S:

# dmsetup deps -o devname


I can see that sda1 (sda) is currently mounted as my primary root and swap disk.
Which means that /dev/sdb will be my new HANA disk:

# ls -l /dev/sd*


WARNING: Adjust the commands below to the finding above, so you use the correct unused disk and don’t overwrite your root disk.
Create the new partition on the disk:

# fdisk /dev/<your disk device e.g. sdb>

Then enter:

n <return>
p <return>
1 <return>
<return>
<return>
t <return>
8e <return>
w <return>

At the end, the fdisk command exits.
Re-run fdisk to check your new partition:

Create the volume group and logical volume:

# pvcreate /dev/sdb1
# vgcreate /dev/volHANA /dev/sdb1
# lvcreate -L 51072M -n lvHANA1 volHANA

Format the new XFS (only one really supported) logical volume:

# mkfs.xfs /dev/volHANA/lvHANA1

Mount the new partition:

# mkdir /hana
# echo “/dev/volHANA/lvHANA1 /hana xfs defaults 0 0”   >> /etc/fstab
# mount -a

That is it for Part #2 of this guide.
Continue on to Part #3 for the completion of our HANA 2.0 install.

HowTo: Install SAP HANA 2.0 in a VM in less than 30minutes – Part #1

For the original post back in 2014 we used SAP HANA 1.0 sps07 and installed into a Virtual Machine running SUSE Linux 11.
Things have moved on since 2014 and we have now seen the arrival of HANA 2.0 with multi-tenant database feature and new HANA Cockpit and SUSE Enterprise Linux 12 with it’s new systemd daemon replacement of the old SYS V init scripts.
I decided it was time to update the post…
Scenario: You want to prototype something for a new HANA 2.0 database.  We can use the power of a virtual machine to get a HANA 2.0 database up and running in less than 30 minutes.
Well, it was supposed to be 30 minutes, and it sure can be 30 minutes, providing you have the right (fast) equipment to hand.
Remember, this is not a “Here’s the standard install process” hand-holding stuff – this is let’s get it installed and use it!
Here’s how…

What you’ll need:
– SAP HANA In Memory DB 2.0 install media from SAP Software Download Centre. 
This can be the Platform Edition (for native HANA systems) or the Enterprise Edition (for S/4HANA or BW/4HANA or any other x/4HANA).
I also cheated a little in my process, since I downloaded the “Installation / Patch” for a HANA database, since this contains the latest entire code line and installer but is much less in size.
In my example I use IMDB_SERVER20_012_3-80002031.SAR which is ~3.5GB in size.

– The SUSE Linux for SAP v12 sp02 or sp03 (recommended) install media (ISO).
This is free to download from https://download.suse.com (although you will need to register an account with SUSE) but you don’t need a license.  This is ~3.6GB in size and you only need the first DVD (DVD1).

– A valid license for the HANA database (platform edition or enterprise edition).

– SAP HANA Studio installed on a PC which can access the virtual HANA server you’re going to create (the Studio install media is contained within the full HANA install media DVD, or you can download it separately from SAP Software Download Centre).
In my example, I’m using IMC_STUDIO2_212_3-80000323.SAR (should be the same revision as the database) which is 734MB in size.
NOTE: The later revisions of HANA come with the HANA Cockpit built-in (web based) so you may not need the HANA Studio, it depends what you want to do with it.  See SAP note 2185556 for more details.

– A host machine to host the virtual machine.  You need at least 20GB of RAM, although if you configure your pagefile (in Windows) on SSD or flash, you could get away with 16GB (I did !!!).
– SAP notes access.  Specifically to read/check SAP notes 1984787, 2205917 & 1944799.
– A downloaded version of SAPCAR.exe on your PC (if, like me, you will be using the VMWare shared folders option to present your downloaded media to the gues O/S).

What we’re going to do:
– We’ll create a basic SUSE Linux for SAP 12 SP3 virtual machine.  You can use any host OS, I’m using Windows 7 64bit and VMWare Workstation Player v14.
– Because most people are using VMs to maximise infrastructure, we’ll go through a couple of steps to really reduce the O/S memory footprint and for efficiency we use SSH and the text mode installer for HANA.  We get this whole thing running in less than 16GB of RAM in the end.
– We’ll install a basic HANA 2.0 database (in multi-tennant mode – this is the future).  Initially we only get the SYSTEM DB, then we create a new tenant DB afterwards.

START THE CLOCK!

Create your basic VM for SUSE Enterprise Linux (I’m using SUSE Linux 12 for SAP SP3).
It will need the following resources:
– More than 16GB of RAM (initially 24GB for installation) on the physical host machine .
– 8GB of disk for the O/S.
– 50GB of disk for the basic HANA DB with nothing in it, plus the installed software.
– 20GB of disk on the physical host  for swapping (if you don’t have 24GB of RAM).
– 2 CPUs if you can spare the cores.
– A hostname and fully qualified domain name.
– Some form of networking (use “Bridged” if you need to access this across the network, I will be using “Host-Only”).
Let’s create the VM and set the CDROM to point to the SUSE Linux 12 SP3 install DVD ISO file:

We choose to do the install later to avoid the VMWare “EasyInstall” feature:


Set the initial hard disk to have 8GB and store it in one big file (it’s up to you really):

Now customise the hardware:
Set the RAM to 24GB or more (you really need 24GB of RAM, but I have only 16GB and will be ready for some serious swapping).  After installation, at a minimum the VM should have 18GB of RAM for day-to-day running:

Give the VM at least 2 cores:

Set the CD/DVD to use the SUS Linux installation ISO you downloaded:

Use bridged networking if you need to access over the network, but only if you have DHCP enabled or you’re a network guru.  I’m using “Host-only”:

I also removed the Sound Card and Printer.
Summary:

Start the VM.

We’re off.
The SUSE install took 12.5 minutes in my testing on a core i5 (unfortunately only 3rd gen 🙁  )
That is it for Part #1 of this guide.
>> Continue on to Part #2 for the completion of our HANA 2.0 install.

HowTo: Install HANA Lifecycle Manager

Scenario:  You’ve followed my previous post on how to install a basic HANA DB and now you would like to install HANA LM into the same instance so that you can patch HANA and perform other LM tasks.

What you will need:
– A working HANA DB instance.
– The HANA installation media (usually an ISO file).

This will take less than 10 minutes if you already have the install media.
I have already converted the HANA install media DVD into an ISO file so that I can easily mount it as a virtual cdrom in a VM.
If you haven’t converted the install media to an ISO, you can always upload the media directly, or if you’re working in a VM, you can use the Shared Folders functionality to share a folder directly from the host O/S to the guest SUSE Linux VM.

Mount the ISO as a cdrom (I’m using a Virtual Machine as my SUSE HANA server).

On the cdrom you will have a directory containing the installation media for the HANA LM tool:

# cd /media/DATA_UNITS/SAPHANALM_LINUX_X86_64

As the root Linux user, run the installation tool (note: your HANA system can be shutdown during this process, especially if you have a low amount of memory):

# ./hdbinst

SAP HANA Lifecycle Manager installation kit detected.

SAP HANA Database Installation Manager – SAP HANA HLM Installation 1.50.00.000000
*********************************************************************************
Options:
  SAP HANA system ID | Description
  ———————————————————
  H10                | SAP HANA Database H10 1.00.70.386119

Enter SAP HANA system ID [H10]:

Root user password. Mandatory for Distributed system with not configured Trusted SSH Connectivity, or                    else not applicable. [“”]:

Root user SSH passphrase. Optional for Distributed system with configured Trusted SSH Connectivity, or                    else not applicable. [“”]:

Checking installation…
Preparing package “SAP HANA lifecycle manager”…
Installing SAP HANA Lifecycle Manager to /hana/shared/H10/HLM…
Installing package ‘SAP HANA lifecycle manager’ …

Installation takes approximately 10 minutes.

From HANA Studio, you can now open the Lifecycle Manager:

SAP HANA Lifecycle Manager install

HowTo: Install SAP HANA into a VM in less than 30minutes

Scenario: You want to prototype something and you don’t have the hardware available for a new prototype HANA database.  Instead, you can use the power of a virtual machine to get a HANA SPS07 database up and running in less than 30 minutes.
Well, it was supposed to be 30 minutes, and it sure can be 30 minutes, providing you have the right equipment to hand.
As I found out, working on a slow disk, limited CPU system, extended this to 2 hours from start to finish.
Here’s how…

Update: 09/2014, if you’re using SPS08 (rev 80+) then this will also work, but people have had issues trying to perform the install with the media converted to an ISO.  Instead, just use the VMWare “Shared Folders” feature to share the install files from your PC into the SUSE VM.

What you’ll need:
– SAP HANA In Memory DB 1.0 SPS07 install media from SAP Software Download Centre.  This is media ID 51047423.
– The SUSE Linux for SAP v11 sp02 or sp03 install media (ISO).
– A valid license for the HANA database (platform edition or enterprise edition).
– SAP HANA Studio rev 70 installed on a PC which can access the virtual HANA server you’re going to create (the Studio install media is contained within the HANA install media DVD, or you can download it separately).
– A host machine to host the virtual machine.  You need at least 20GB of RAM, although if you configure your pagefile (in Windows) on SSD or flash, you could get away with 16GB (I did !!!).

What we’re going to do:
– We’ll create a basic SUSE Linux for SAP virtual machine.  You can use any host OS, I’m using Windows 7 64bit.
– Because most people are using VMs to maximise infrastructure, we’ll go through a couple of steps to really reduce the O/S memory footprint (we disable X11 as one of these steps).  We get this whole thing running in less than 16GB of RAM in the end.
– We’ll install a basic HANA database.
– We disable the XS-Engine (saving a lot of memory) which you don’t have to do if you absolutely need it.  The XS-Engine is a lightweight application server for hosting the next generation HANA based APPS.

START THE CLOCK!

Create your basic VM for SUSE Enterprise Linux (I’m using SUSE Linux for SAP SP2).
It will need the following resources:
– More than 16GB of RAM (preferably 24GB) on the physical host machine .
– 8GB of disk for the O/S.
– 50GB of disk for the basic HANA DB with nothing in it, plus the installed software.
– 20GB of disk on the physical host  for swapping (if you don’t have 20GB of RAM).
– 2 CPUs if you can spare the cores.
– A hostname and fully qualified domain name.
– Some form of networking (use “Bridged” if you need to access this across the network).

Let’s create the VM and set the CDROM to point to the SUSE Linux SP2 install DVD ISO file:
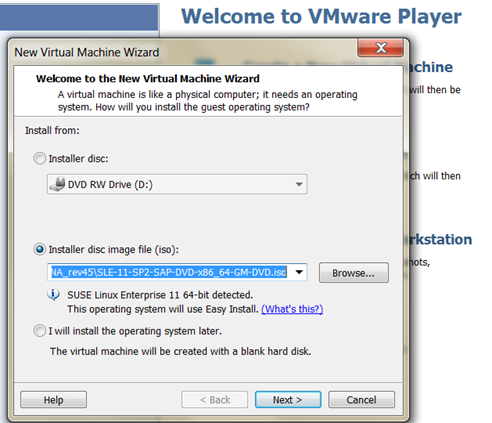
Create HANA VM with SUSE ISO

Confirm the VM full name, your username and your preferred password (for the username and for root):

HANA VM gets a full name

Set the location to store your VM files:

HANA VM files location

Set the initial hard disk to have 8GB and store it in one big file (it’s up to you really):
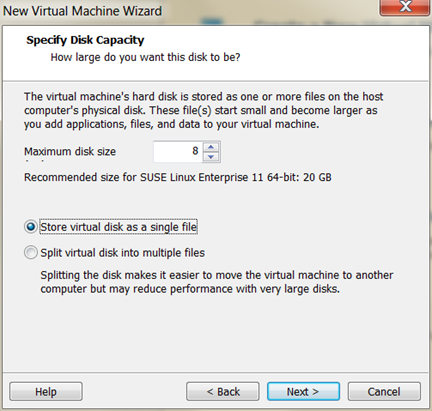
HANA VM needs 8GB for SUSE

Now customise the hardware:

HANA VM needs more hardware

Set the RAM to 20GB or more (you really need 24GB of RAM, but I have only 16GB and will be ready for some serious swapping).  At a minimum the VM should have 18GB of RAM for day-to-day running:
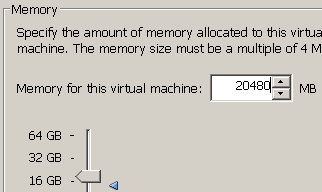
  HANA VM needs 20GB RAM

Give the VM at least 2 cores:

HANA VM needs more than 2 cores

Use bridged networking if you need to access over the network, but only if you have DHCP enabled or you’re a network guru:

HANA VM needs networking

Start the VM.

We’re off.
The SUSE install took 12.5 minutes in my testing on a core i5 (unfortunately only 3rd gen 🙁  ):

SUSE install progresses

Oh look, it reckons that we have 12mins 19 seconds left until completed:
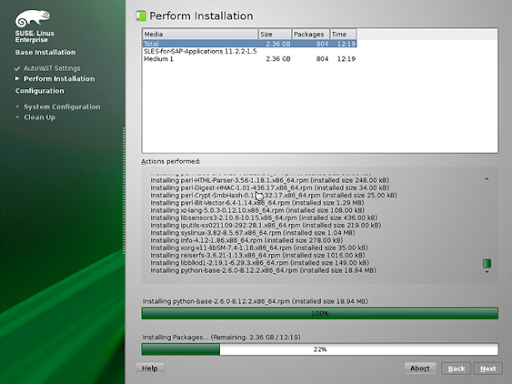
SUSE packages installed 12mins remain.

Boom, SUSE is up!

image

Shutdown the VM again so that we can add the second hard disk:

HANA VM second hard disk is added

SUSE HANA VM second hard disk
SUSE HANA VM new virtual disk

It’s SCSI as recommended:

SUSE HANA VM scsi disk

We set it to max out at 50GB (set yours however large you think you will need it, but we will create this in a volume group so you can always add more hard disks and just expand the volume group in SUSE):

 image

NOTE: If you’re going to be moving this VM around using USB sticks, you may want to choose the “Split…” option so that the files might fit.

Give the VMDK a file name (I’ve added “HANADB” so I can potentially plug and play this disk to other VMs):
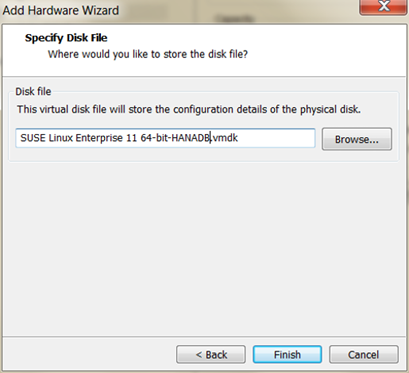
SUSE HANA VM vmdk name

Also re-add the CDROM drive (mine went missing after the install, probably due to VMWare player’s Easy Install process):

image

Configure the CDROM to point to the ISO for the SUSE install DVD again.
Start the VM again:

start SUSE HANA VM

Notice the Kernel version we have is 3.0.13-0.27:
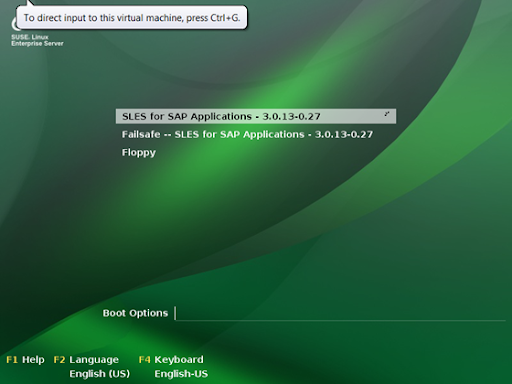
image

From the bottom bar in SUSE, start YAST and select the “Network Settings” item:

SUSE HANA VM network settings

Disable IPv6 on the “Global Options” tab:

disable IPV6

On the hostname tab set the hostname and FQDN:

SUSE HANA VM set hostname and fqdn

Apply those changes and quit from YAST.
Right click the desktop and open a Terminal:
SUSE HANA VM terminal

Add your specific IP address and hostname (fqdn) plus the short hostname to the /etc/hosts file using vi:

SUSE HANA VM hostname and fqdn setup

Save the changes to the file and quit vi.

Reboot the HANA VM from the terminal using “shutdown -r now”.
Once it comes back up, you need to check the hostname resolution:
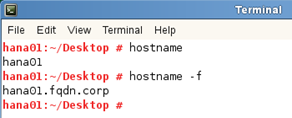
SUSE HANA VM check hostname

According to the HANA installation guide I’m following, we need to apply some recommended settings following SAP note 1824819:

SAP note 1824819

So we run the command to disable the transparent huge pages:

# echo never > /sys/kernel/mm/transparent_hugepage/enabled

I checked the C-state and it was fine on my Intel CPU.

We’re not using XFS so I don’t need to bother with the rest, I don’t want to patch my GlibC, but feel free to if you wish.

15 MINUTES HAVE NOW ELAPSED!

A quick recap, we should have working SUSE VM, it should be booted and you should have the SUSE DVD loaded in the virtual CDROM.

Open a new Terminal window:

SUSE HANA VM terminal

Now install the following Java 1.6 packages from the source distribution (these are part of the HANA install guide for sp07, page 15):

# cd /media/SLE-11-SP2-SAP-DVD-x86_640025/suse/x86_64

# rpm -i –nodeps java-1_6_0-ibm-*

The rest of the requirements are already installed in SUSE EL 11 sp2 for SAP.

Now we create the volume group for the HANA database and software.
First check which disk you’re using for the O/S:

chekc disk for HANA OS

So, I’m using “sda” as my primary disk.
This means that “sdb” will be my HANA disk
.
WARNING: Adjust the commands below to the finding above, so you use the correct unused disk and don’t overwrite your root disk.

Create the new partition on the disk:

# fdisk /dev/<your disk device e.g. sdb>

Then enter:

n <return>
p <return>
1 <return>
<return>
<return>
t <return>
1 <return>
8e <return>
w <return>

At the end, the fdisk command exits.

Re-run fdisk to check your new partition:
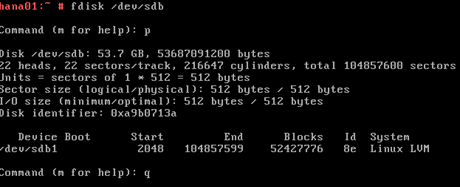
image

Create the volume group and logical volume:

# pvcreate /dev/sdb1
# vgcreate /dev/volHANA /dev/sdb1
# lvcreate -L 51072M -n lvHANA1 volHANA

Format the new logical volume:

# mkfs.ext3 /dev/volHANA/lvHANA1

Mount the new partition:

# mkdir /hana

# echo “/dev/volHANA/lvHANA1 /hana ext3 defaults 0 0”   >> /etc/fstab

# mount -a

Check the new partition:

# df -h /hana

Filesystem                   Size  Used Avail Use% Mounted on
/dev/mapper/volHANA-lvHANA1   50G  180M   47G   1% /hana

Create the required directory locations (H10 is out instance name):

# mkdir -p /hana/data/H10  /hana/log/H10  /hana/shared

Now set the LVM to start at boot:

# chkconfig –level 235 boot.lvm on

Now we’ve got somewhere to create our HANA database and put the software.
To perform the HANA install, I’ve converted my downloaded HANA install media into an ISO file that I can simply mount as a CD/DVD into the VMware tool.
Instead of this method, you could alternatively use the Shared Folders capability and simply extract the file to your local PC, sharing the directory location through VMware to the guest O/S.  The outcome will be the same.

Mount the ISO file (HANA install media, from which I’ve created an ISO for ease of use).
You can do this by presenting the ISO file as the virtual CDROM from within VMWare.

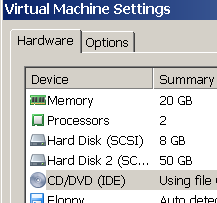
Open the properties for the virtual machine and ensure that you select the CDROM device:
image

On the right-hand side, enable the device to be connected and powered on, then browse for the location of the ISO file on your PC:
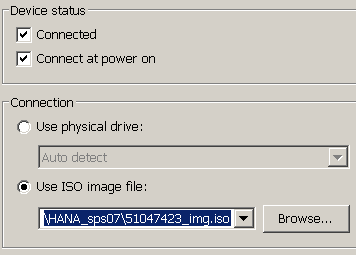
image

Apply the settings to the VM.

Prior to starting the install, we can reduce our memory footprint of the O/S by over 1GB.
Use vi to change the file /etc/inittab so that the default runlevel is 3 (no X-windows):

image

Also, disable 4 services that are more than likely not needed and just consume memory:

Disable VMware thin printing:

# chkconfig vmware-tools-thinprint off

Disable Linux printing:

# chkconfig cups off

Disable Linux auditing:

# chkconfig auditd off

Disable Linux eMail SMTP daemon:

# chkconfig postfix off

Disable sound:

# chkconfig alsasound off

Disable SMBFS / CIFS:

# chkconfig smbfs off

Disable NFS ( you might need it…):

# chkconfig nfs off

Disable splash screen:

# chkconfig splash off

Disable the Machine Check Events Logging capture:

# chkconfig mcelog off

Double check the IP address of your VM:

# ifconfig | grep inet

image

Your IP address should be listed (you can see mine is 192.168.174.129).
If you don’t have one, then your VM is not quite setup correctly in the VMWare properties or your networking configuration is not correct, or you don’t have a DHCP server on your local network, or your network security is preventing your VM from registering it’s MAC address.  It’s complex.

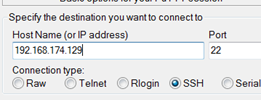
Assuming that you have an IP address, check that you can connect to the SSH server in your VM using PUTTY :

image

Enter the IP address of your VM server:
image

Log into the server as root:

image

From this point onwards, it is advisable to use the PUTTY client tool to connect, as this provides a more feature rich access to your server environment, than the basic VMWare console connection.
You now need to restart the virtual server:

# shutdown -r now

Once the server is back, re-connect with PUTTY.
We will not use the GUI for installing the HANA system (hdblcmgui), because this takes more time and more memory away from our basic requirement of a HANA DB.
Mount the cdrom inside the SUSE O/S:

# mount /dev/cdrom /media

Change to the install location inside the VM and then run the hdbinst tool (this is the lowest common denominator regarding HDB installation):

# cd /media/DATA_UNITS/HDB_SERVER_LINUX_X86_64

# ./hdbinst –ignore=check_diskspace,check_min_mem

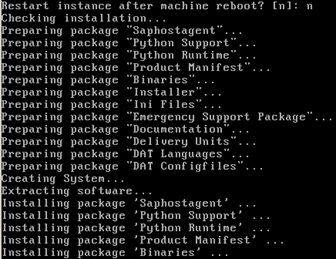
You will be prompted for certain pieces of information.  Below is what was entered:
Installation Path:   /hana/shared
System ID:             H10
Instance Number: 10
System Administrator Password:  hanahana
System Administrator Home Dir:  /usr/sap/H10/home
System Administrator ID:  10001
System Administrator Shell:  /bin/sh
Data Volumes:  /hana/data/H10
Log Volumes:   /hana/log/H10
Database SYSTEM user password:   Hanahana1
Restart instance after reboot:  N

Installation will begin:
image

My HANA DB install took approximately 1 hour 20 minutes on a Core i5 with 16GB RAM, 5400rpm HDD (encrypted) plus a large pagefile (not encrypted):

Snap653 2014-02-27, 12_47_56

******  OPTIONAL ********
After the install completed, I then followed SAP note 1697613 to remove the XS-Engine from the landscape to reduce the memory footprint even further:
From HANA Studio, right click the system and launch the SQL Console:

image

Run the following SQL statements (changing the host name accordingly):

select host from m_services where service_name = ‘xsengine’
select VOLUME_ID from m_volumes where service_name = ‘xsengine’
ALTER SYSTEM ALTER CONFIGURATION (‘daemon.ini’, ‘host’, ‘hana01’) UNSET (‘xsengine’,’instances’) WITH RECONFIGURE
ALTER SYSTEM ALTER CONFIGURATION (‘topology.ini’, ‘system’) UNSET (‘/host/hana01’, ‘xsengine’)  WITH RECONFIGURE


NOTE: Change the value “<NUM>” below to be what is reported as the volume number in the second SQL statement above.

ALTER SYSTEM ALTER CONFIGURATION (‘topology.ini’, ‘system’) UNSET (‘/volumes’, ‘<NUM>’)  WITH RECONFIGURE

The XS-Engine process will disappear.
You can now restart the HANA instance using HANA Studio.

****************

This completes the HANA DB install.
At the end of this process you should have a running HANA database in which you can execute queries.
It’s possible you can reduce the VM memory allocation to 16GB and the HANA instance will still start (if you remove the XS-Engine).
You should note that we don’t have the HANA Lifecycle Manager installed.  You’ll need to complete this if you want to patch this instance.  However, for 15mins work, you can re-install!

NOTE: Consider SAP note 1801227 “Change Time Zone if SID is not changed via Config. Tool” v4.   The default timezone for the HANA database doesn’t appear to be set correctly.
You can also check/change the Linux O/S timezone in file “/etc/sysconfig/clock”.