This blog contains experience gained over the years of implementing (and de-implementing) large scale IT applications/software.

HowTo: Find the Datacentre Region and Physical Host of your Azure VM

With VMs hosted in Azure you need a fine balance between protection from hardware failure on the underlying Azure platform, plus performance from having the tiers of your SAP application being physically close together.

For this very purpose, Microsoft introduced Proximity Placement Groups (PPGs) to allow an administrator to ensure that specific tiers (e.g. application and database) are located close. Potentially even in the same server rack.
The PPGs also affect the location of the storage assigned to the VMs, although the storage infrastructure is actually transparent to administrators.

The PPGs still allow Azure to honor the Availability Sets, Fault Domains and Update Domains.

In this post, I show a method of finding the physical hostname of your Linux VM which could be part of a check before/after implementing a PPG.
NOTE: PPGs should be created at the time a VM is created, and assigned to the “lead” system of the rarest size. Example, an M-series VM is rare, so this should be the lead system when creating the PPG. This will anchor the other VMs to this M-series VMs location.

A separate post shows how to do this for a Windows VM.
On a Linux VM in Azure, as any Linux user, you can use the following to see the name of the physical host on which your VM is running:

awk -F 'H' '{ sub(/ostName/,"",$2); print $2 }' /var/lib/hyperv/.kvp_pool_3

Example output: DUB012345678910

In this case, we take the first 3 chars to be “Dublin”, which is in the EU North Azure region.
The remaining characters consist of the rack and physical hostname.

If you have 2 VMs in the same rack on the same physical host, then you will have minimal latency for networking between them.

Conversely, if you have 2 VMs on the same physical host, you are open to HA issues.

Therefore, you need a good balance for SAP.
You should expect to see SAP S/4HANA application servers and HANA DBs in the same Proximity Placement Groups, within the same rack, even potentially on the same host (providing you have availability sets across the tiers you will be safe).

Update: 23-Apr-2020
To get the above script output into a bash variable, the output contains hidden characters, we can use the following:

awk '{ gsub(/[^[:print:]]/,""); split ($0,a,"H"); sub(/ostName/,"",a[2]); print a[2]}' /var/lib/hyperv/.kvp_pool_3

Update: 05-Oct-2020
I have since found that there is another location where the above information can also be found.
Depending on your Linux O/S, you may also find the physical server name in the network scripts as follows:

grep BOOTSERVERNAME /var/run/netconfig/eth0/netconfig0

The aboe will return something like:
BOOTSERVERNAME=’AMS072nnnnnnnnn’

SUSE Cloud-Netconfig and Azure VMs – Dynamic Network Configuration

What is SUSE Cloud-Netconfig:
Within the SUSE SLES 12 (and OpenSUSE) operating system, lies a piece of functionality called Cloud-Netconfig.
It is provided as part of the System/Management group of packages.

The Cloud-Netconfig software consists of a set of shell functions and init scripts that are responsible for control of the network interfaces on the SUSE VM when running inside of a cloud framework such as Microsoft Azure.
The core code is part of the SUSE-Enceladus project (code & documents for use with public cloud) and hosted on GitHub here: https://github.com/SUSE-Enceladus/cloud-netconfig.
Cloud-Netconfig requires the sysconfig-netconfig package, as it essentially provides a netconfig module.
Upon installation, the Cloud-Netconfig module is prepended to the front of the netconfig module list like this: NETCONFIG_MODULES_ORDER=”cloud-netconfig dns-resolver dns-bind dns-dnsmasq nis ntp-runtime”.

What Cloud-Netconfig does:
As with every public cloud platform, a deployed VM is allocated and booted with the configuration for the networking provided by the cloud platform, outside of the VM.
In order to provide the usual networking devices and modules inside the VM with the required configuration information, the VM must know about its environment and be able to make a call out to the cloud platform.
This is where Cloud-Netconfig does its work.
The Cloud-Netconfig code will be called at boot time from the standard SUSE Linux init process (systemd).
It has the ability to detect the cloud platform that it is running within and make the necessary calls to obtain the networking configuration.
Once it has the configuration, this is persisted into the usual network configuration files inside the /sysconfig/network/scripts and /netconfig.d/cloud-netconfig locations.
The configuration files are then used by the wicked service to adjust the networking configuration of the VM accordingly.

What information does Cloud-Netconfig obtain:
Cloud-Netconfig has the ability to influence the following aspects of networking inside the VM.
– DHCP.
– DNS.
– IPv4.
– IPv6.
– Hostname.
– MAC address.

All of the above information is obtained and can be persisted and updated accordingly.

What is the impact of changing the networking configuration of a VM in Azure Portal:
Changing the configuration of the SUSE VM within Azure (for example: changing the DNS server list), will trigger an update inside the VM via the Cloud-Netconfig module.
This happens because Cloud-Netconfig is able to poll the Azure VM Instance metadata service (see my previous blog post on the Azure VM Instance metadata service).
If the information has changed since the last poll, then the networking changes are instigated.

What happens if a network interface is to remain static:
If you wish for Cloud-Netconfig to not manage a networking interface, then there exists the capability to disable management by Cloud-Netconfig.
Simply adjusting the network configuration file in /etc/sysconfig/network and set the variable CLOUD_NETCONFIG_MANAGE=no.
This will prevent future adjustments to this network interface.

How does Cloud-Netconfig interact with Wicked:
SUSE SLES 12 uses the Wicked network manager.
The Cloud-Netconfig scripts adjust the network configuration files in the locations /sysconfig/network/scripts which are then detected by Wicked and the necessary adjustments made (e.g. interfaces brought online, IP addresses assigned or DNS server lists updated).
As soon as the network configuration files have been written by Cloud-Netconfig, this is where the interaction ends.
From this point the usual netconfig services take over (wicked and nanny – for detecting the carrier on the interface).

What happens in the event of a VM primary IP address change:
If the primary IP address of the VM is adjusted in Azure, then the same process as before takes place.
The interface is brought down and then brought back up again by wicked.
This means that in an Azure Site Recovery replicated VM, should you activate the replica, the VM will boot and Cloud-Netconfig will automatically adjust the network configuration to that provided by Azure, even though this VM only contained the config for the previous hosting location (region or zone).
This significantly speeds up your failover process during a DR situation.

Are there any issues with this dynamic network config capability:
Yes, I have seen a number of issues.
In SLES 12 sp3 I have seen issues whereby a delay in the provision of the Azure VM Instance metadata during the boot cycle has caused the VM to lose sight of any secondary IP addresses assigned to the VM in Azure.
On tracing, the problem seemed to originate from a slowness in the full startup of the Azure Linux agent – possibly due to boot diagnostics being enabled.  A SLES patch is still being waited on for this fix.

I have also seen a “problem” whereby an incorrect entry inside the /etc/hosts file can cause the reconfiguration of the VM’s hostname.
Quite surprising.  This caused other custom SAP deployment script related issues as the hostname was being relied on to be in a specific intelligent naming convention, when instead, it was being changed to a temporary hostname for resolution during an installation of SAP sing the Software Provisioning Manager.

How can I debug the Cloud-Netconfig scripts:
According to the manuals, debug logging can be enabled through the standard DEBUG=”yes” and WICKED_DEBUG=”all” variables in config file /etc/sysconfig/network/config.
However, casting an eye over the scripts and functions inside of the Cloud-Netconfig module, these settings don’t seem to be picked up and sufficient logging produced.  Especially around the polling of the Azure VM Instance metadata service.
I found that when debugging I had to actually resort to adjusting the function script functions.cloud-netconfig.

Additional information:
https://www.suse.com/c/multi-nic-cloud-netconfig-ec2-azure/
https://www.suse.com/documentation/sles-12/singlehtml/book_sle_admin/book_sle_admin.html
https://github.com/SUSE-Enceladus/cloud-netconfig
https://www.suse.com/media/presentation/wicked.pdf
https://github.com/openSUSE/wicked

SUSE Linux 12 – Kernel 4.4.73 – Boot Hang – BTRFS Issue

I had a VMWare guest running SUSE Linux 12 SP3 64bit (kernel 4.4.73).
One day after a power outage, the VM failed to boot.
It would arrive at the SUSE Linux “lizard” splash screen and then just hang.

I noticed prior to this error that the SUSE 12 operating system creates it’s root partition inside a logical volume call “/dev/system/root” and it is then formatted as a BTRFS filesystem.

At this point I decided that I must have a corrupt disk block.
I launched the VM with the CDROM attached and pointing at the SUSE 12 installation ISO file.
While the VM starts you need to press F2 to get to the “BIOS” boot options to enable the CDROM to be bootable before the hard-disks.

Once the installation cdrom was booting, I selected “Recovery” from the SUSE menu.
This drops you into a recovery session with access to the BTRFS filesystem check tools.

Following a fair amount of Google action, I discovered I could run a “check” of the BTRFS file system (much like the old fsck on EXT file systems).

Since I already knew the device name for the root file system, things were pretty easy:

# btrfs check /dev/system/root
Checking filesystem on /dev/system/root

found 5274484736 bytes used err is 0

Looks like the command worked, but it is showing no errors.
So I tried to mount the partition:

# mkdir /old_root
# mount -t btrfs /dev/system/root /old_root

At this point the whole VM hung again!
I had to restart the whole process.
So there was definately an issue with the BTRFS filesystem on the root partition.

Starting the VM again and re-entering the recovery mode of SUSE, I decided to try and mount the partition in recovery mode:

# mkdir /old_root
# mount -t btrfs /dev/system/root /old_root -o ro,recovery

It worked!
No problems.  Weird.
So I unmounted and tried to re-mount in read-write mode again:

# umount /old_root
# mount -t btrfs /dev/system/root /old_root

BAM! The VM hung again.

Starting the VM again and re-entering the recovery mode of SUSE, I decided to just run the btrfs command with the “repair” command (although it says this should be a last resort).

# btrfs check –repair /dev/system/root
enabling repair mode
Checking filesystem on /dev/system/root
UUID: a09b7c3c-9d33-4195-af6e-9519fe550694
checking extents
Fixed 0 roots.
checking free space cache
cache and super generation don’t match, space cache will be invalidated
checking fs roots
checking csums
checking root refs
found 5274484736 bytes used err is 0
total csum bytes: 4909484
total tree bytes: 236126208
total fs tree bytes: 215973888
total extent tree bytes: 13647872
btree space waste bytes: 38681887
file data blocks allocated: 5186543616

Maybe this cache problem that it fixed is the issue.

# mkdir /old_root
# mount -t btrfs /dev/system/root /old_root

Yay!
So, weird problem fixed.
Maybe this is a Kernel level issue and later Kernels have a patch, not sure.  It’s not my primary concern to fix this as I don’t plan on having many power outages, but if it was my production system then I might be more concerned and motivated.

When SLES for SAP is not SLES for SAP

I recently downloaded and installed “SUSE Enterprise Linux for SAP 12 SP3” into a local virtual machine.
It seemed to contain everything that I thought it would contain with regards to included SAP Linux packages.

Noteable were the following in my local VM:

# which saptune
/usr/sbin/saptune
# rpm -qa | grep sap
cyrus-sasl-gssapi-32bit-2.1.26-7.1.x86_64
sap-netscape-link-0.1-1.2.noarch
sap-installation-wizard-3.1.81-3.1.x86_64
yast2-sap-scp-1.0.3-11.2.noarch
saptune-1.1.3-1.1.x86_64
saprouter-systemd-0.2-1.1.noarch
cyrus-sasl-gssapi-2.1.26-7.1.x86_64
patterns-sles-sap_server-12-77.8.x86_64
patterns-sles-sap_server-32bit-12-77.8.x86_64
yast2-saptune-1.2-1.5.noarch
sap-locale-32bit-1.0-92.4.x86_64
sapconf-4.1.8-1.18.noarch
sap-locale-1.0-92.4.x86_64
yast2-sap-scp-prodlist-1.0.2-4.2.noarch
# cat /etc/os-release
NAME=”SLES”
VERSION=”12-SP3″
VERSION_ID=”12.3″
PRETTY_NAME=”SUSE Linux Enterprise Server 12 SP3″
ID=”sles”
ANSI_COLOR=”0;32″
CPE_NAME=”cpe:/o:suse:sles_sap:12:sp3″
# uname -a
Linux hana01 4.4.73-7-default #1 SMP Fri Jul 21 13:26:40 UTC 2017 (6beeafd) x86_64 x86_64 x86_64 GNU/Linux

All looks good to me.

I then created an Azure hosted virtual machine using the image “SLES for SAP 12 SP3 (BYOS)”:


The Azure VM seems to be missing a lot of the packages that I would expect to be in place:

# which saptune
which: no saptune in (/sbin:/usr/sbin:/usr/local/sbin:/root/bin:/usr/local/bin:/usr/bin:/bin:/usr/games:/usr/lib/mit/bin)
# rpm -qa | grep sap
patterns-sles-sap_server-12-77.8.x86_64
yast2-sap-scp-prodlist-1.0.2-4.2.noarch
yast2-sap-scp-1.0.3-11.2.noarch
cyrus-sasl-gssapi-2.1.26-7.1.x86_64
sapconf-4.1.10-40.37.1.noarch
# cat /etc/os-release
NAME=”SLES”
VERSION=”12-SP3″
VERSION_ID=”12.3″
PRETTY_NAME=”SUSE Linux Enterprise Server 12 SP3″
ID=”sles”
ANSI_COLOR=”0;32″
CPE_NAME=”cpe:/o:suse:sles_sap:12:sp3″
# uname -a
Linux hana01 4.4.82-6.3-default #1 SMP Mon Aug 14 14:14:02 UTC 2017 (4c72484) x86_64 x86_64 x86_64 GNU/Linux

Notice also that the Kernel release is slightly newer on the Azure image, plus the version of the sapconf package is slightly newer.
The most important point is that the Azure image is missing the saptune package.
This is important as it is a method presented in numerous SAP notes for automatically applying the recommended O/S settings (that’s right, they don’t all get applied out-of-the-box).

HowTo: Install SAP HANA into a VM in less than 30minutes

Scenario: You want to prototype something and you don’t have the hardware available for a new prototype HANA database.  Instead, you can use the power of a virtual machine to get a HANA SPS07 database up and running in less than 30 minutes.
Well, it was supposed to be 30 minutes, and it sure can be 30 minutes, providing you have the right equipment to hand.
As I found out, working on a slow disk, limited CPU system, extended this to 2 hours from start to finish.
Here’s how…

Update: 09/2014, if you’re using SPS08 (rev 80+) then this will also work, but people have had issues trying to perform the install with the media converted to an ISO.  Instead, just use the VMWare “Shared Folders” feature to share the install files from your PC into the SUSE VM.

What you’ll need:
– SAP HANA In Memory DB 1.0 SPS07 install media from SAP Software Download Centre.  This is media ID 51047423.
– The SUSE Linux for SAP v11 sp02 or sp03 install media (ISO).
– A valid license for the HANA database (platform edition or enterprise edition).
– SAP HANA Studio rev 70 installed on a PC which can access the virtual HANA server you’re going to create (the Studio install media is contained within the HANA install media DVD, or you can download it separately).
– A host machine to host the virtual machine.  You need at least 20GB of RAM, although if you configure your pagefile (in Windows) on SSD or flash, you could get away with 16GB (I did !!!).

What we’re going to do:
– We’ll create a basic SUSE Linux for SAP virtual machine.  You can use any host OS, I’m using Windows 7 64bit.
– Because most people are using VMs to maximise infrastructure, we’ll go through a couple of steps to really reduce the O/S memory footprint (we disable X11 as one of these steps).  We get this whole thing running in less than 16GB of RAM in the end.
– We’ll install a basic HANA database.
– We disable the XS-Engine (saving a lot of memory) which you don’t have to do if you absolutely need it.  The XS-Engine is a lightweight application server for hosting the next generation HANA based APPS.

START THE CLOCK!

Create your basic VM for SUSE Enterprise Linux (I’m using SUSE Linux for SAP SP2).
It will need the following resources:
– More than 16GB of RAM (preferably 24GB) on the physical host machine .
– 8GB of disk for the O/S.
– 50GB of disk for the basic HANA DB with nothing in it, plus the installed software.
– 20GB of disk on the physical host  for swapping (if you don’t have 20GB of RAM).
– 2 CPUs if you can spare the cores.
– A hostname and fully qualified domain name.
– Some form of networking (use “Bridged” if you need to access this across the network).

Let’s create the VM and set the CDROM to point to the SUSE Linux SP2 install DVD ISO file:
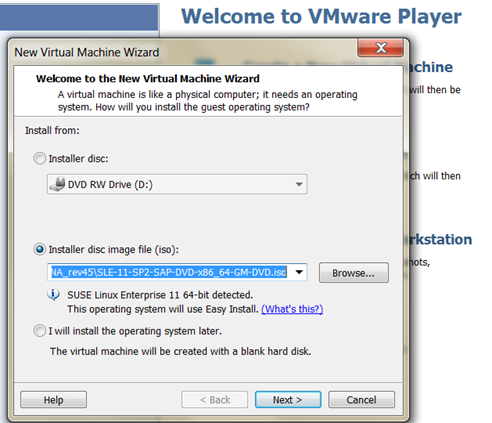
Create HANA VM with SUSE ISO

Confirm the VM full name, your username and your preferred password (for the username and for root):

HANA VM gets a full name

Set the location to store your VM files:

HANA VM files location

Set the initial hard disk to have 8GB and store it in one big file (it’s up to you really):
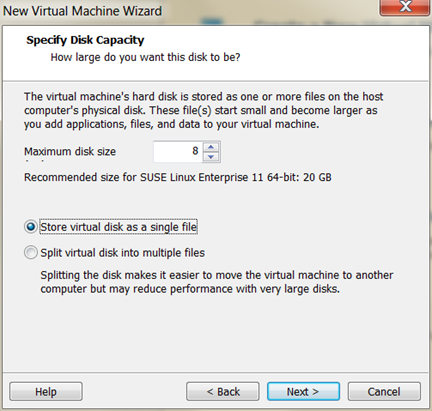
HANA VM needs 8GB for SUSE

Now customise the hardware:

HANA VM needs more hardware

Set the RAM to 20GB or more (you really need 24GB of RAM, but I have only 16GB and will be ready for some serious swapping).  At a minimum the VM should have 18GB of RAM for day-to-day running:
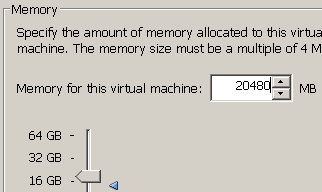
  HANA VM needs 20GB RAM

Give the VM at least 2 cores:

HANA VM needs more than 2 cores

Use bridged networking if you need to access over the network, but only if you have DHCP enabled or you’re a network guru:

HANA VM needs networking

Start the VM.

We’re off.
The SUSE install took 12.5 minutes in my testing on a core i5 (unfortunately only 3rd gen 🙁  ):

SUSE install progresses

Oh look, it reckons that we have 12mins 19 seconds left until completed:
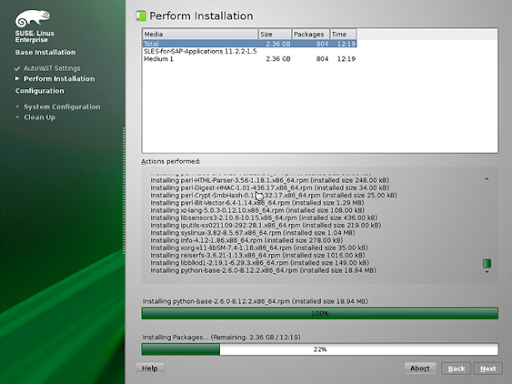
SUSE packages installed 12mins remain.

Boom, SUSE is up!

image

Shutdown the VM again so that we can add the second hard disk:

HANA VM second hard disk is added

SUSE HANA VM second hard disk
SUSE HANA VM new virtual disk

It’s SCSI as recommended:

SUSE HANA VM scsi disk

We set it to max out at 50GB (set yours however large you think you will need it, but we will create this in a volume group so you can always add more hard disks and just expand the volume group in SUSE):

 image

NOTE: If you’re going to be moving this VM around using USB sticks, you may want to choose the “Split…” option so that the files might fit.

Give the VMDK a file name (I’ve added “HANADB” so I can potentially plug and play this disk to other VMs):
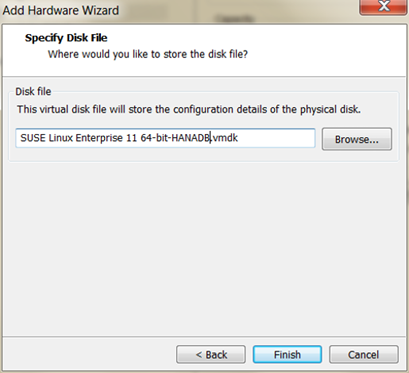
SUSE HANA VM vmdk name

Also re-add the CDROM drive (mine went missing after the install, probably due to VMWare player’s Easy Install process):

image

Configure the CDROM to point to the ISO for the SUSE install DVD again.
Start the VM again:

start SUSE HANA VM

Notice the Kernel version we have is 3.0.13-0.27:
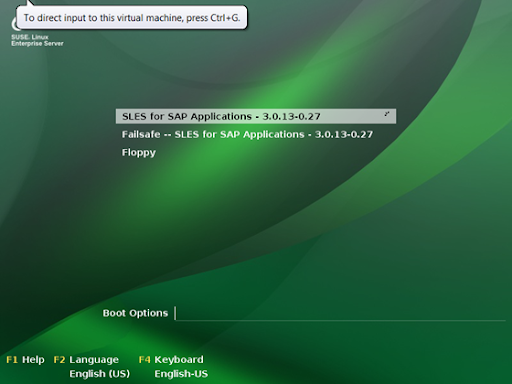
image

From the bottom bar in SUSE, start YAST and select the “Network Settings” item:

SUSE HANA VM network settings

Disable IPv6 on the “Global Options” tab:

disable IPV6

On the hostname tab set the hostname and FQDN:

SUSE HANA VM set hostname and fqdn

Apply those changes and quit from YAST.
Right click the desktop and open a Terminal:
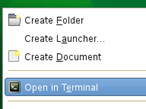
SUSE HANA VM terminal

Add your specific IP address and hostname (fqdn) plus the short hostname to the /etc/hosts file using vi:

SUSE HANA VM hostname and fqdn setup

Save the changes to the file and quit vi.

Reboot the HANA VM from the terminal using “shutdown -r now”.
Once it comes back up, you need to check the hostname resolution:
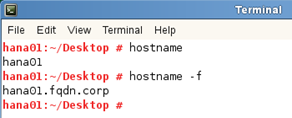
SUSE HANA VM check hostname

According to the HANA installation guide I’m following, we need to apply some recommended settings following SAP note 1824819:

SAP note 1824819

So we run the command to disable the transparent huge pages:

# echo never > /sys/kernel/mm/transparent_hugepage/enabled

I checked the C-state and it was fine on my Intel CPU.

We’re not using XFS so I don’t need to bother with the rest, I don’t want to patch my GlibC, but feel free to if you wish.

15 MINUTES HAVE NOW ELAPSED!

A quick recap, we should have working SUSE VM, it should be booted and you should have the SUSE DVD loaded in the virtual CDROM.

Open a new Terminal window:

SUSE HANA VM terminal

Now install the following Java 1.6 packages from the source distribution (these are part of the HANA install guide for sp07, page 15):

# cd /media/SLE-11-SP2-SAP-DVD-x86_640025/suse/x86_64

# rpm -i –nodeps java-1_6_0-ibm-*

The rest of the requirements are already installed in SUSE EL 11 sp2 for SAP.

Now we create the volume group for the HANA database and software.
First check which disk you’re using for the O/S:

chekc disk for HANA OS

So, I’m using “sda” as my primary disk.
This means that “sdb” will be my HANA disk
.
WARNING: Adjust the commands below to the finding above, so you use the correct unused disk and don’t overwrite your root disk.

Create the new partition on the disk:

# fdisk /dev/<your disk device e.g. sdb>

Then enter:

n <return>
p <return>
1 <return>
<return>
<return>
t <return>
1 <return>
8e <return>
w <return>

At the end, the fdisk command exits.

Re-run fdisk to check your new partition:
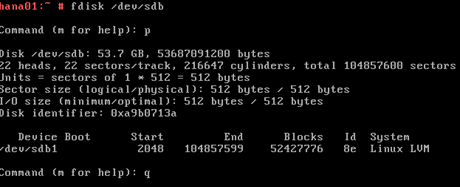
image

Create the volume group and logical volume:

# pvcreate /dev/sdb1
# vgcreate /dev/volHANA /dev/sdb1
# lvcreate -L 51072M -n lvHANA1 volHANA

Format the new logical volume:

# mkfs.ext3 /dev/volHANA/lvHANA1

Mount the new partition:

# mkdir /hana

# echo “/dev/volHANA/lvHANA1 /hana ext3 defaults 0 0”   >> /etc/fstab

# mount -a

Check the new partition:

# df -h /hana

Filesystem                   Size  Used Avail Use% Mounted on
/dev/mapper/volHANA-lvHANA1   50G  180M   47G   1% /hana

Create the required directory locations (H10 is out instance name):

# mkdir -p /hana/data/H10  /hana/log/H10  /hana/shared

Now set the LVM to start at boot:

# chkconfig –level 235 boot.lvm on

Now we’ve got somewhere to create our HANA database and put the software.
To perform the HANA install, I’ve converted my downloaded HANA install media into an ISO file that I can simply mount as a CD/DVD into the VMware tool.
Instead of this method, you could alternatively use the Shared Folders capability and simply extract the file to your local PC, sharing the directory location through VMware to the guest O/S.  The outcome will be the same.

Mount the ISO file (HANA install media, from which I’ve created an ISO for ease of use).
You can do this by presenting the ISO file as the virtual CDROM from within VMWare.

Open the properties for the virtual machine and ensure that you select the CDROM device:
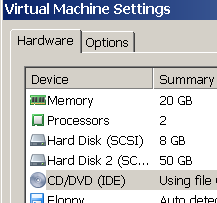
image

On the right-hand side, enable the device to be connected and powered on, then browse for the location of the ISO file on your PC:
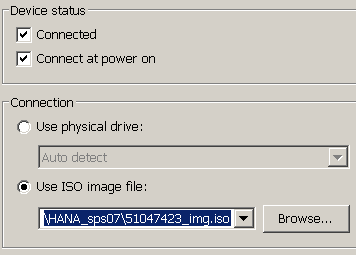
image

Apply the settings to the VM.

Prior to starting the install, we can reduce our memory footprint of the O/S by over 1GB.
Use vi to change the file /etc/inittab so that the default runlevel is 3 (no X-windows):

image

Also, disable 4 services that are more than likely not needed and just consume memory:

Disable VMware thin printing:

# chkconfig vmware-tools-thinprint off

Disable Linux printing:

# chkconfig cups off

Disable Linux auditing:

# chkconfig auditd off

Disable Linux eMail SMTP daemon:

# chkconfig postfix off

Disable sound:

# chkconfig alsasound off

Disable SMBFS / CIFS:

# chkconfig smbfs off

Disable NFS ( you might need it…):

# chkconfig nfs off

Disable splash screen:

# chkconfig splash off

Disable the Machine Check Events Logging capture:

# chkconfig mcelog off

Double check the IP address of your VM:

# ifconfig | grep inet

image

Your IP address should be listed (you can see mine is 192.168.174.129).
If you don’t have one, then your VM is not quite setup correctly in the VMWare properties or your networking configuration is not correct, or you don’t have a DHCP server on your local network, or your network security is preventing your VM from registering it’s MAC address.  It’s complex.

Assuming that you have an IP address, check that you can connect to the SSH server in your VM using PUTTY :

image

Enter the IP address of your VM server:
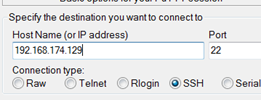
image

Log into the server as root:

image

From this point onwards, it is advisable to use the PUTTY client tool to connect, as this provides a more feature rich access to your server environment, than the basic VMWare console connection.
You now need to restart the virtual server:

# shutdown -r now

Once the server is back, re-connect with PUTTY.
We will not use the GUI for installing the HANA system (hdblcmgui), because this takes more time and more memory away from our basic requirement of a HANA DB.
Mount the cdrom inside the SUSE O/S:

# mount /dev/cdrom /media

Change to the install location inside the VM and then run the hdbinst tool (this is the lowest common denominator regarding HDB installation):

# cd /media/DATA_UNITS/HDB_SERVER_LINUX_X86_64

# ./hdbinst –ignore=check_diskspace,check_min_mem

You will be prompted for certain pieces of information.  Below is what was entered:
Installation Path:   /hana/shared
System ID:             H10
Instance Number: 10
System Administrator Password:  hanahana
System Administrator Home Dir:  /usr/sap/H10/home
System Administrator ID:  10001
System Administrator Shell:  /bin/sh
Data Volumes:  /hana/data/H10
Log Volumes:   /hana/log/H10
Database SYSTEM user password:   Hanahana1
Restart instance after reboot:  N

Installation will begin:
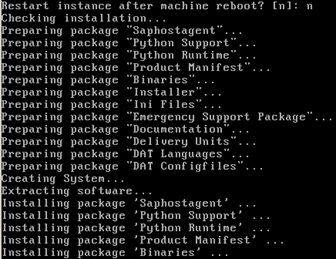
image

My HANA DB install took approximately 1 hour 20 minutes on a Core i5 with 16GB RAM, 5400rpm HDD (encrypted) plus a large pagefile (not encrypted):

Snap653 2014-02-27, 12_47_56

******  OPTIONAL ********
After the install completed, I then followed SAP note 1697613 to remove the XS-Engine from the landscape to reduce the memory footprint even further:
From HANA Studio, right click the system and launch the SQL Console:

image

Run the following SQL statements (changing the host name accordingly):

select host from m_services where service_name = ‘xsengine’
select VOLUME_ID from m_volumes where service_name = ‘xsengine’
ALTER SYSTEM ALTER CONFIGURATION (‘daemon.ini’, ‘host’, ‘hana01’) UNSET (‘xsengine’,’instances’) WITH RECONFIGURE
ALTER SYSTEM ALTER CONFIGURATION (‘topology.ini’, ‘system’) UNSET (‘/host/hana01’, ‘xsengine’)  WITH RECONFIGURE


NOTE: Change the value “<NUM>” below to be what is reported as the volume number in the second SQL statement above.

ALTER SYSTEM ALTER CONFIGURATION (‘topology.ini’, ‘system’) UNSET (‘/volumes’, ‘<NUM>’)  WITH RECONFIGURE

The XS-Engine process will disappear.
You can now restart the HANA instance using HANA Studio.

****************

This completes the HANA DB install.
At the end of this process you should have a running HANA database in which you can execute queries.
It’s possible you can reduce the VM memory allocation to 16GB and the HANA instance will still start (if you remove the XS-Engine).
You should note that we don’t have the HANA Lifecycle Manager installed.  You’ll need to complete this if you want to patch this instance.  However, for 15mins work, you can re-install!

NOTE: Consider SAP note 1801227 “Change Time Zone if SID is not changed via Config. Tool” v4.   The default timezone for the HANA database doesn’t appear to be set correctly.
You can also check/change the Linux O/S timezone in file “/etc/sysconfig/clock”.